-40%
Custom Kroll Switch Upgrade for Pelican M1/M3/M6 Incandescent (all batches)
$ 12.4
- Description
- Size Guide
Description
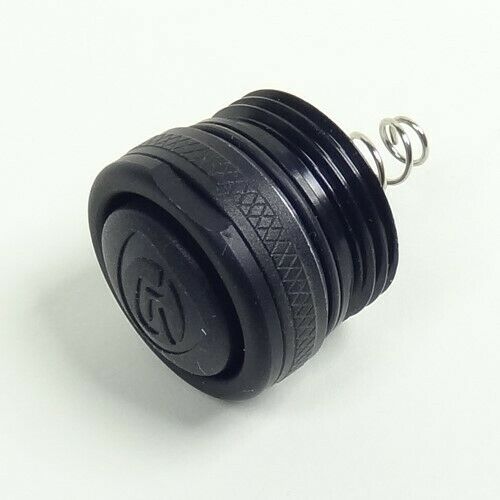
Up for listing: custom brass Kroll switch assy (sleeve with installed switch) for use with Pelican incandescent M1(3310)/M3(3370)/M6(2320/2390) tailcap hosts (dubbed "Type B" assy)Compatible with batches manufactured before and after 2014
Recommended for upgrading all stock clicky tailcap setups (not suitable for upgrading twisty tailcap chassis)
Inspired by original Sandwich Shoppe bare aluminum sleeve design (also compatible with pre-2014 batches only)
Kroll switch preinstalled and preadjusted
Low in stock -- may be discontinued once sold out
Highlights and features:
- Designed exclusively for Judco Kroll (1052) clicky switch mecha only (NOT compatible with McClicky)
- Replaces stock silent clicky switch mecha for a more robust and reliable clicky switch operation (for models equipped with stock silent clicky tailcap). User serviceability via use of commercially available Kroll clicky which allows for easy replacement (stock clicky mecha CANNOT be replaced once defective)
- Retains similar amount of tailcap threads (as compared with stock spec) for latching (screwing) into body's tail threads; only slight increase in body/tail gap length (no more than 3mm total)
- Sleeve height (overall) ~17mm; outer thread height ~5.5mm
- Supports switch lockout function (only if tailcap host is reanodized inside-out with internal threads fully covered, at customer's expense)
NOTE: some advanced skills required for those having pre-2014 clicky tailcaps
Disassembly instructions:
1. Using needle nose pliers, unscrew black plastic receiver and remove contents (contact spring + pin, main clicky mecha with soldered PCB);
2. Moist and clean threads and affected areas with industrial-grade solvent (pref. acetone-based) to weaken/dissolve glue, then use cotton swabs and/or pick/hook to carefully scrape out residue;
3. Once tailcap host is dry (no wet solvent) and threads are free of aforementioned glue residue, wiggle and spin out brass disc by wedging center hole with finger or flat nose pliers with reverse-taped (ie. adhesive facing outside) tips. Brass disc itself should be only weakly (or even not) threadlocked, is ~2mm thick, and can be effectively removed using the nose plier method;
4. (Optional) Carefully drill two small torque holes on brass disc to assist removal/reinstallation using needle nose pliers. If (3) fails then drilling will have to done within tailcap host to initiate disc removal. If so, do it carefully to avoid over-drilling resulting in underside component damage;
5. Remove remaining components: spring, aluminum (or plastic) boot void fill, inner aluminum collar ring (use aforementioned flat nose plier method to assist removal), switch boot
6. Reclean and relubricate tail host's inside threads. Reinstall switch boot and aforementioned aluminum collar ring;
7. Using needle nose pliers, screw assembled Kroll switch module into tail host till snug
Disassembly instructions (post-2014 tailcap):
1. Using needle nose pliers, unscrew black plastic receiver and remove first layer of components (contact spring + pin, main clicky mecha), then unscrew inner retainer ring and remove the second layer of components (spring, metal boot void fill, switch boot);
2. Clean and relubricate tail host's inside threads. Keep internal collar area (as part of tailcap host's integrated machining) clean and dry;
3. Reinstall switch boot. Make sure the outer flange rests in the groove above tailcap's collared area;
4. Using needle nose pliers, screw assembled Kroll switch housing into tail host till snug
Tailcap host compatibility:
1. Pre-2014 tailcap host (ie. without battery position indicator): very good fitment with switch housing effectively screwed in snug (with top edge of housing pressing boot's underside flange). Yields 4+ turns with tailcap assy screwed into body. Narrow tailcap/body gap length. Requires aluminum collar ring (from original clicky switch chassis components) for effective installation and proper boot seating;
2. Post-2014 (2014+) tailcap host (ie. with embossed battery position indicator): very good fitment with switch housing effectively screwed in snug (with top edge of housing pressing boot's underside flange). Yields ~4 turns with tailcap assy screwed into body. Narrow tailcap/body gap length (<3mm). Switch position may need to be fine tuned for optimal sensitivity during clicky actuation;
3. May NOT be compatible with some native LED models esp. those with frontal flush switch;
4. NOT suitable for upgrading early-spec M6 twisty tailcap (Use Type A sleeve instead)
NOTE: If you are to upgrade a stock clicky tailcap, please consider choosing this Type-B switch assy instead of the Type-A assy, due to the latter's limited availability which needs to be reserved for customers who need to upgrade a stock twisty tailcap
What you get from this sale is
- ONE said switch housing with new bare Kroll clicky installed
NO other accessories, flashlight components etc. included
Listing pictures for reference only
All units tested for operability and will be retested prior to shipping
Type A Kroll switch/sleeve upgrade available here
https://www.ebay.com/itm/253891017654
NOTES on Shipping:
- Only registered international shipping provided (NO lower-tier shipping options available)
- Standard registered airmail may be upgraded to e-Express service (where and when applicable or necessary)
- Final shipping method varies according to region (subject to change depending on current postal logistics situations during pandemic outbreak)
- Orders CANNOT be shipped to certain destinations where ALL postal services are being suspended during the outbreak. Refer to the following links for more detail
https://www.hongkongpost.hk/en/about_us/whats_new/notices/index.html
https://www.hongkongpost.hk/en/about_us/whats_new/press_release/index.html
https://www.hongkongpost.hk/en/about_us/whats_new/service_delay_suspension/index.html
Seller reserves all rights to refuse and cancel orders according to the aforementioned notices as issued by the local PO service
Please send PM for any questions.
Thanks for looking


